

With the roaring popularity of the Broth Importantly post (all 250,000 of you who read it—thank you), I wanted to add some information to address questions you may have now and in the future. Or perhaps you will never ask these questions, but you may be in need of some reading material. So here you go.
Q: My mom always stuck cloves into the onions that she put in the broth. Do I need to do this or is it OK to just drop the cloves in?
A: First of all, your hanging preposition is forgiven. You can impale the onions or not—your choice. Sticking the cloves into the onion has the benefit of preventing the cloves and the onion skins from floating loosely all over your pot. This step probably won’t matter anyway if you are adding all the other spices, though. It has no effect on the taste. (Don’t tell your mom.) But, it is kind of fun to do, and when someone is watching you do this, he or she will think you are really smart. Caution about adding spices early in your broth making process, as they may turn it bitter. Use the onion/clove cutesy thing if you’re doing a quick broth of 3 hours or so. Or save it for the last stage of brothing.
Q: After I strained out my vegetables and meat, I tasted my broth prior to reducing. It was definitely bitter. Why did this happen, and can this broth be saved?
A: You have a two part question! We only allow one part questions. I am sorry, but an answer cannot be provided. Oh, what the heck:
Several factors contribute to sour or bitter broth:
- Burned bones or vegetables (if you pre-roasted them).
- Overabundance of bitter vegetables, herbs (celery, parsley, rosemary, cilantro).
- Cooking too long with the spices in the mix. (You don’t want to cook spices for more than 1 hour—add at the end of your process to prevent this.)
- Too much citrus for too long. Citrus is something I really like, but have now learned is best added the last hour of simmering. Add a half a lemon for some nice zing during the end of simmering.
- Impatience in general. You’re not done yet, so don’t give up. Once properly reduced, it might sweeten up.
- Impatience with dried mushrooms (if you used dried mushrooms—a super addition for beef and veal broth, but not so great with chicken broth). Rehydrate them next time prior to adding to the broth. If you did not, you’ll just have to let them have more time.
- Alcohol—not good at the start of any broth. Wait ’til it’s almost done before you start drinking next time.
Saving the broth—between each of these cures, you must taste. If fixed, proceed no further! These cures assume you have a pot of about 10 cups of broth.
- Reduce and add salt. (This may improve the flavor. Some sea salt is actually somewhat sweet.)
- Add a cup or two of carrots, sweet potatoes, apples, or parsnips, or a combo of them, to your strained broth and simmer for 25 min to an hour. (You’ll have to strain again, though.)
- If still bitter, add a couple dashes of fish sauce.
- This is sort of sacrilegious, but you can add a half teaspoon of brown sugar or raw cane sugar at a time. Be very sparing with this—you are not making teriyaki and you do not want a sweet taste.
- If beef or veal stock, add a teaspoon of soy sauce at a time (teriyaki warning above).
- If beef or veal stock: once reduced, add 2 teaspoons of Kitchen Bouquet. (Frankly, this works nicely even if there is not a problem.)
- Get desperate and put some raw ground beef or raw poultry chopped fine (8 oz or less) and mixed with an egg white back into the broth. Let it float to top and do NOT disturb the raft of meat. Simmer very low and do NOT stir to avoid breaking up the raft. After 40 minutes on very low, skim off the raft and strain your stock/broth again. Let’s be truthful here, this last step is so involved, you might as well start over again and use the meat you would likely waste in your new stock.
- If all else fails, pour another glass of wine and drink it. Dump the broth out for the dogs. They’ll really like it. Gravy Train! Chock up the experience to one of life’s little lessons.
Q: What items in a broth make it sweet? Which bitter?
A: Carrots, garlic and parsnips add sweetness the broth. Parsley and celery are more bitter. Over-simmered herbs and spices make it bitter. Failure is also bitter, but not if you ask the dogs after they’ve enjoyed your failed experiment.
Q: Is reducing broth different than just simmering?
A: Yes. Next question.
OK, OK, I was just teasing.
The entire broth jive is: ingredients, cold water, one boil, scum skim, simmer, simmer, strain, reduce. You have permission to slowly boil the broth during the reduction stage. However, you really need to watch it if you boil it during this stage. Once I ended up with broth caramel. It was pretty neat. I put it into little ice cube trays and made frozen bouillon. But my pot took a full week of soaking to recover. Remember, salt to taste after you have reduced.
Q: My broth is cloudy and murky. Why?
A: There are several explanations for this:
- Chemistry: Murky broth is caused by particulate matter in the liquid suspension.
- Sloth: You were too lazy to cut the fat off your meat. It melted and then your pot boiled, creating this mess.
- Incompetence: You forgot that you are not supposed to boil your broth after the initial boil.
- Cheapness: You won’t buy the cheesecloth to strain the broth because it is too expensive.
- Gravy Train: You had some leftover gravy that you just tossed in with the broth. There is nothing that can undo this, but it probably tastes good.
Whatever your reason, if you are not out to impress people, the cloudiness of the broth shouldn’t affect the taste. It is nice to have a clear broth if you are going to make soups, pho, aspics, or light sauces, though. And it will have a cleaner “mouth feel” if more of the fat is out.
Cures can be performed for most of the above in any order, but first let the broth cool—even chill in the fridge—and take off the fat that forms at the top. (BTW, this fat is amazing to cook with. It’s called schmaltz if it is chicken fat.) In the winter when our temps are below 40, I simply put mine covered out on the back deck picnic table. . . I know, this sounds very hillbilly. But why not use Mother Nature’s refrigerator! You’ll need to reheat the broth after skimming to make it liquid enough to strain. You may find that after this step all you will need to do is a basic strain. If not, keep going.
- Double or triple strain it through multiple layers of cheesecloth or a nice loose weave kitchen towel, and finally if absolutely necessary through a coffee filter (which will take a very long time: you should be able to listen to an entire Pink Martini CD during this process!).
- Add a couple eggs shells (don’t wash them out—the leftover whites will help to pick up the impurities) and slowly warm. Strain afterwards.
Q: What is the best container and method to store my awesome broth?
A: If you are using it within the next 2 days, put it in the fridge. However, you’ll make so much that you’ll likely want to freeze it. I like leftover Parmesan cheese or salsa plastic containers from the grocery store. (Question from Mr. Artifact: “What do those poor Parmesans know about broth anyway?”) They are each about 2 cups, which is a great size for your individual use and for stacking in the freezer. If you really won’t use more than a ¼ C at a time, you can freeze it in ice cube trays, then unmold and put into baggies in the freezer. It will last about 9-12 months, but you will be unlikely to ever have any that long. I find that I have to make broth every 1-2 weeks. Once you have it, you will find it will become indispensable to you.
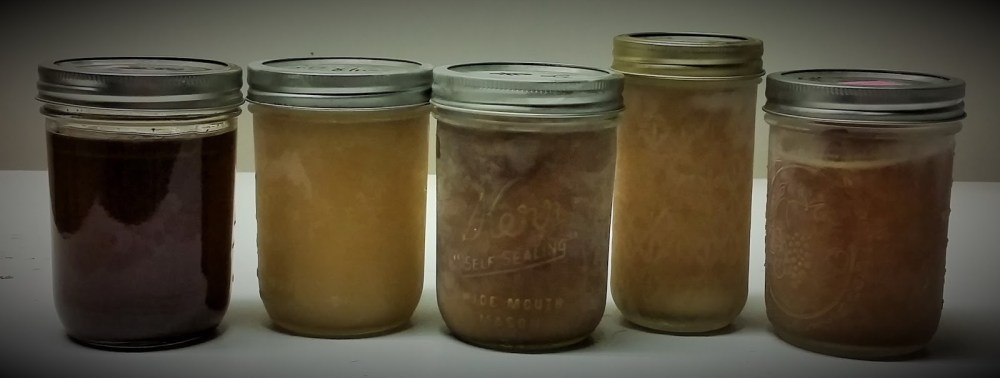 Post note: Since writing this I have come to the conclusion that it is better to store in glass mason jars—wide neck pints work best.
Q: Frozen broth is great, but when I need it, I can’t wait for it to thaw all day. What to do?
A: This is probably going to get me in trouble with the food safety police, but what I do is submerge the jar into a bowl of very warm water. I find that it thaws enough to empty into a pan in about 15 minutes (more reasons to use the straight sided jars!) or completely thaws in about 30. Most bad things were eradicated in your reduction stage anyway. And, if your broth has been frozen for over 2 weeks, more unpleasantries will have expired during the freezing process. But it is “up to you” to paraphrase Marcus Aurelius. If you are a germaphobe, you will just need to thaw your broth 24 hours ahead of time in the fridge.

Q: Will my broth gel?
A: If you have enough bones with cartilege, it will gel. It will not be gelatin-like when warm, but when chilled it will likely gel. If it does not, do not worry. It will still be tasty. The addition of feet and necks and wings really adds to the gel-ability of your broth.
Q: How in the world do you use up so much broth in a typical week?
A: Here are uses in our household over the last week or so that used approximately 8 cups of broth:
- Deglazed pan, reduced juices, and made a nifty sauce with butter and pan juices to nap a stuffed leg of lamb and mashed turnips/potatoes.
- Substituted broth for half of water in recipe for fennel and bean soup.
- Cooked rice pilaf in broth instead of water.
- Made gravy for chicken and apple sausage dumplings.
And, if you make pho (excellent Vietnamese noodle soup), you’ll use up 8-10 cups with that recipe alone! Many purists insist on pork broth for that.
Good luck and may the broth be with you!
–Stacey
